Sun Sensitive Paper is a classic summer activity – grab some leaves and flowers, lay them flat on special paper, wait a few minutes and ta-da! you have a nature print.
Nature Prints on Sun Paper
Sick Science! Summer Camp - A classic summer activity with a twist.
Here's What You'll Need
-
Sun Sensitive Fabric
-
Sun Sensitive Paper
-
Sink or tub of water for rinsing
-
Drying rack
-
Flat items - leaves, blocks, letters, etc
-
Cardboard (optional)
-
Pushpins (optional)
Experiment
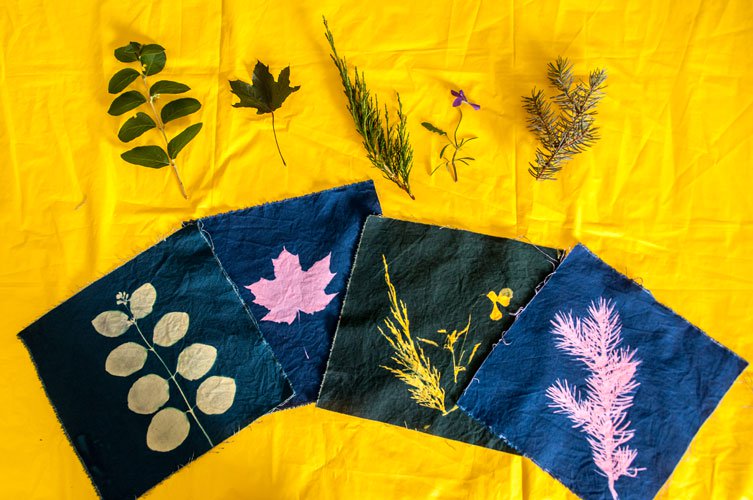
- Start out by finding some flat objects that will leave a good shadow. Get creative. Look inside and out. Some of the best items we have found are leaves, scissors, cutout letters, charms, geometric blocks and stencils.
- Lay out and plan what you want to do as a design first.
-
Keep in mind taller items may leave extra shadows or unclear patterns.
The paper measures 5 1/2” by 7 1/2” and the fabric measures 8.5″ by 8.5″ - Take out the fabric or paper and lay it flat. It's helpful if you lay it on a piece of cardboard and tack it down with pushpins. If you have other paper or light items you may want to use the pushpins to hold them in place. Note that the pushpins will also leave a circle print on your paper or fabric – some like that as a design element. This isn't necessary, especially if you have a steady hand.
- Take the fabric out into the sun and leave it for about 10 minutes. You can do this on a cloudy day, but leave it out for about 20 minutes for full processing.
- The paper will only take about 2 minutes to process in the sunlight. Leave for about 5 minutes on a cloudy day.
- Bring it inside and remove all of the objects and take the fabric or paper off the cardboard.
- Rinse fabric under cold water until the water runs dry. About 2-4 minutes.
- Let paper sit in cold water for about a minute.
- Hang to dry.
- Use the fabric to make hankerchiefs, pillowcases or doll blankets. Use your imagination.
How Does It Work?
Sun Print Fabric and Paper are treated with a special light sensitive chemicals, then dried and sealed in a light-proof bag. When you place objects on the paper or fabric, they block the light. When exposed to the sun, the fabric or paper around the objects will change color. Water stops the process and fixes the image.
What does it teach?
Learn about the nature of sunlight and how light-sensitive chemicals work. From here, launch a discussion about how color photos are developed, as each layer of chemicals on the film react to photons of different color. Also learn about sunlight and it's effects, even on a cloudy day.
Additional Info
Science Fair Project:
Test your sunscreen! Cut a sheet of sun sensitive paper into squares. Collect sunscreens with different SPFs and spread one on each square. Expose them to the sun, and see what happens! Record your data and document your research. Is a sunscreen with 45 SPF more effective than one with a SPF 15?
Helpful Tips and Tricks
- It is helpful to do this activity with three adults – one setting up designs, one outside and one at the sink. It is most helpful to have an adult to double check the rinsing and squeeze out all water.
- Pin fabric squares to a piece of cardboard for stability.
- Keep everything on top pinned down. We had a few disasters at first, because the wind blew everything off the square as the students carried their boards outside. Have the kids pin all light items. Just be aware of potential shadows from push pins. A non-UV blocking piece of glass will also work well.
- Use only flat items. The more 3D an item is, the less of an impact it will have. We used paper letters, geometric shapes, leaves (leaves with different shapes and edges work best), necklaces, plastic animals (lay down, don’t stand up), jacks, flowers, ribbons, buttons, beads and anything else the students could find.
- Don’t move anything or cast shadows onto the fabric once it is in the sunlight.
- Do this activity in the middle of the day when the sun is overhead and shadows are at a minimum.
- You can do this on a cloudy day (I tried it the day before). The fabric will need to sit out longer, more like 20-25 minutes to allow for full processing.
- The fabric isn’t going to change much in the sunlight. You can carefully look under one of your shapes to see if the fabric is working. The real color change won’t come until you rinse it in the sink.
- Rinse completely until the water runs clear. Squeeze out all extra water. We noticed the water ran clear, but when we squeezed the water out, there was still some dye left in the fabric.
- Wash your hands after rinsing or it may stain skin.
- We used a laundry drying rack to hang the wet fabric on.
- This project is certified non-hazardous but eating the fabric isn’t a great idea. It tastes terrible.
Observations
- It's good to test your design and timing techniques first. Cut a piece of paper or the fabric comes with a tester strip.
- You don't have to set up in a dark room, but make sure you are inside and away from the sunlight when you lay out your design. Any sunlight will begin the processing so you don't want it in the sun until you are ready.
- Flourescent light will not process or damage the fabric or paper.
- This is a perfect group project for classes, summer camps or sleepovers.
ACTIVITY TIME: Approx 30 minutes total
Set up will take about 10 to 15 minutes, depending on the materials you use and need to find. Allow 2-10 minutes for processing in the sunlight and about 5 minutes to rinse, hang and clean up.