
Homemade Ice Cream
The Roman emperor, Nero, is credited as the first person to have a type of ice cream made for his meals. Snow was used to […]
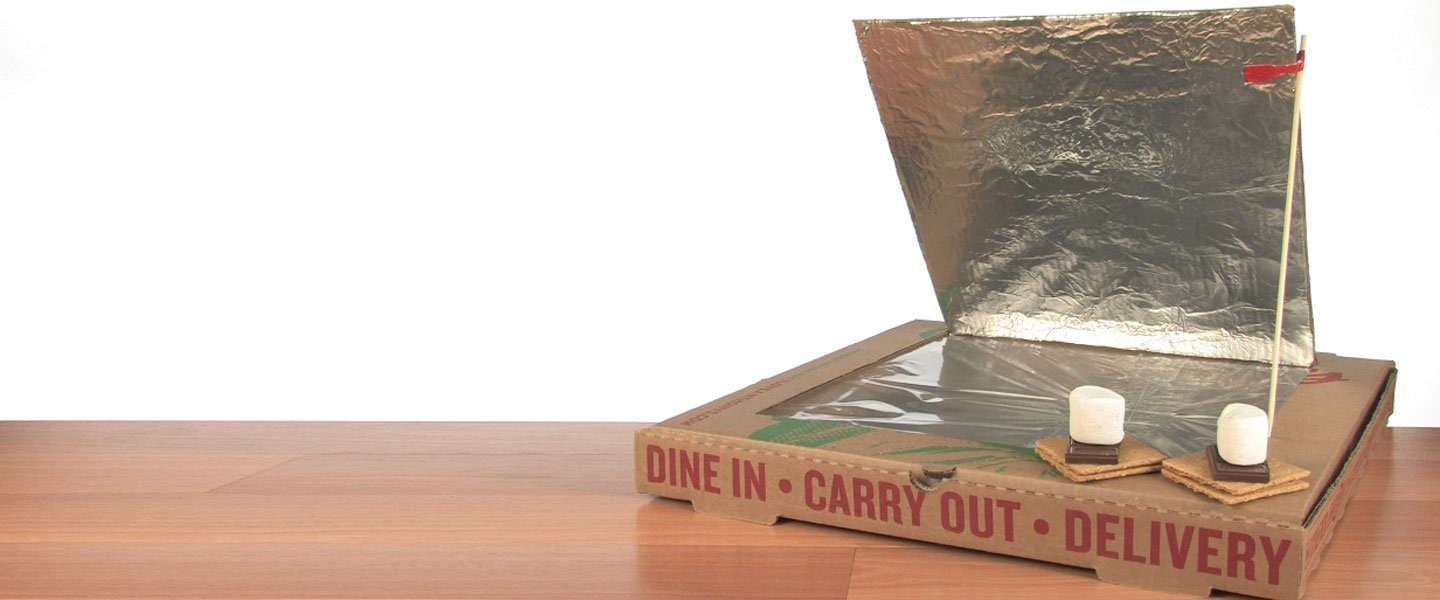
So many great things are synonymous with “summertime yummies!” We can’t think of a summer treat we enjoy quite as much as a s’more: warm, drippy chocolate oozing around a melted marshmallow and sandwiched in a graham cracker. But, what would you do if you weren’t allowed to have a fire or didn’t have the materials needed to build one? We came up with a pretty neat way to harness solar energy to create a simple solar-powered cooker. You can make a delicious batch of s’mores without a fire!
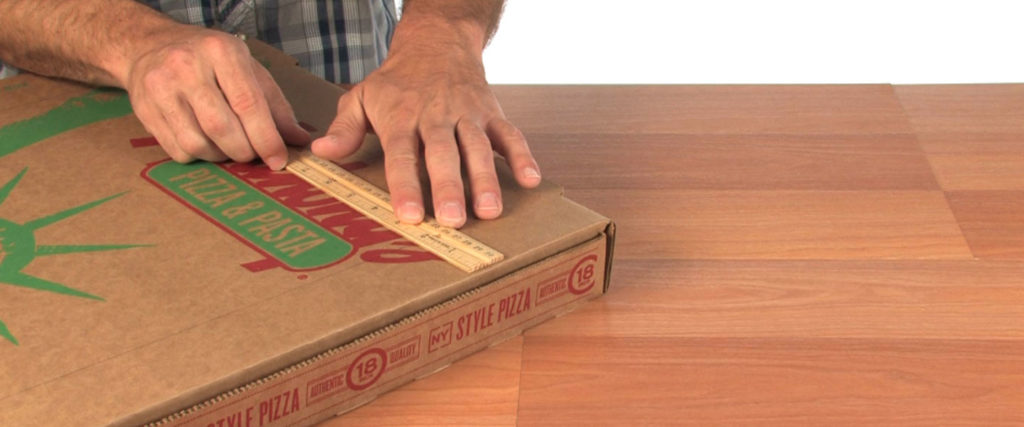
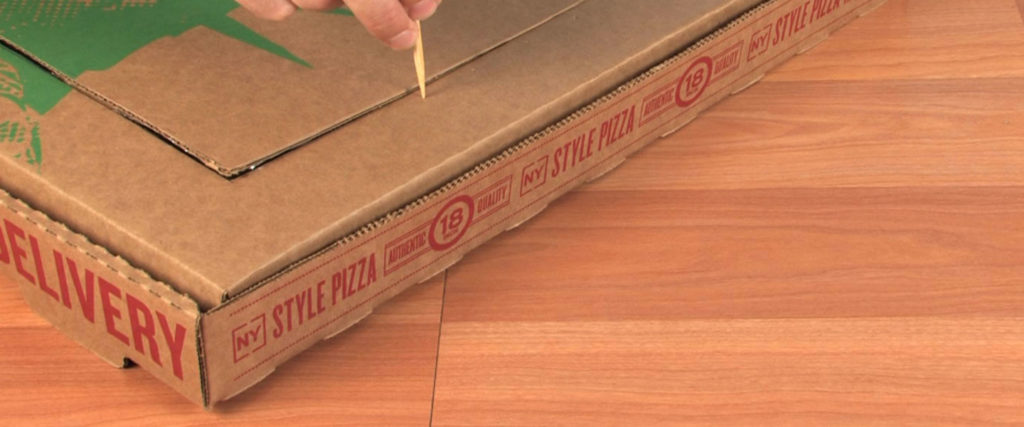
On the outside of the lid of the pizza box, measure and draw a square that’s about 2′′ (5 cm) from the four edges of the box. Cut along the front and two sides of the square using a box cutter or scissors. Don’t cut along the hinge side but you may need to score the cardboard slightly along the hinge side. The square becomes a flap that lifts up on the hinge side in place of the lid.
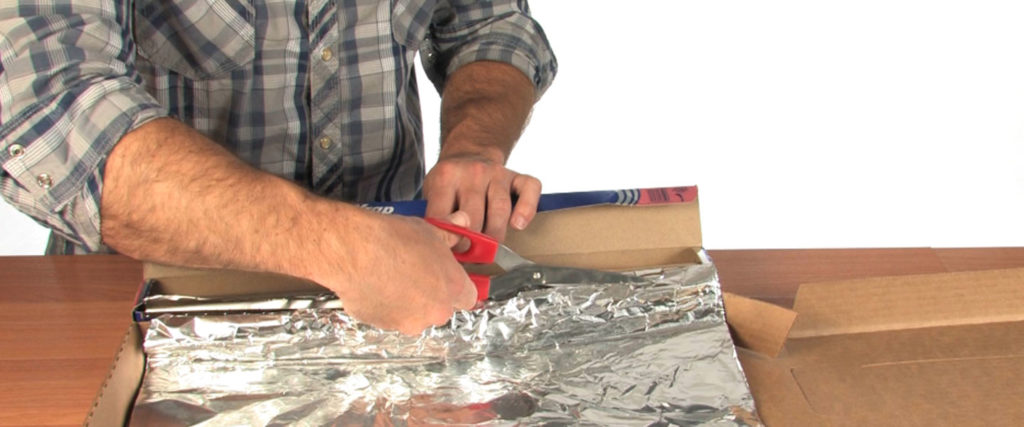
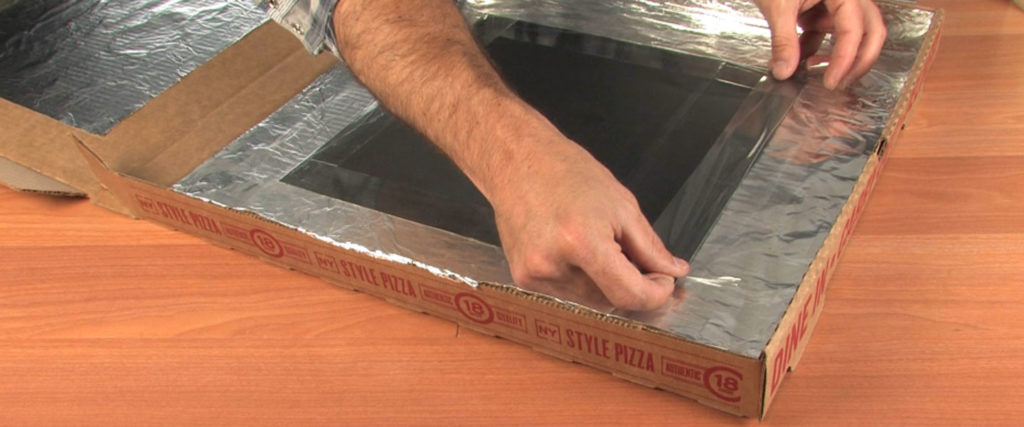
Measure and cut a piece of aluminum foil large enough to line the entire bottom and two sides of the pizza box. Be sure to use the foil with the shiny side out. You may need to join two narrower pieces to do this. Fold them together along an edge and press the seam between them flat and tight against the table.
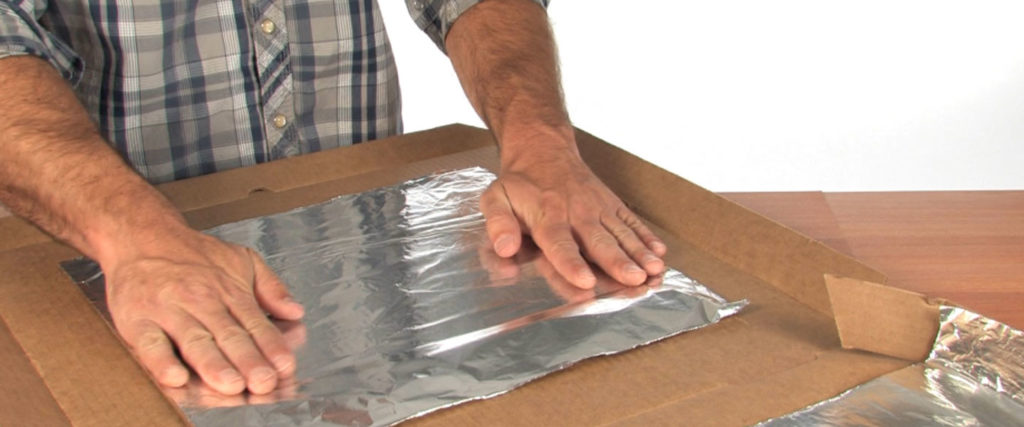
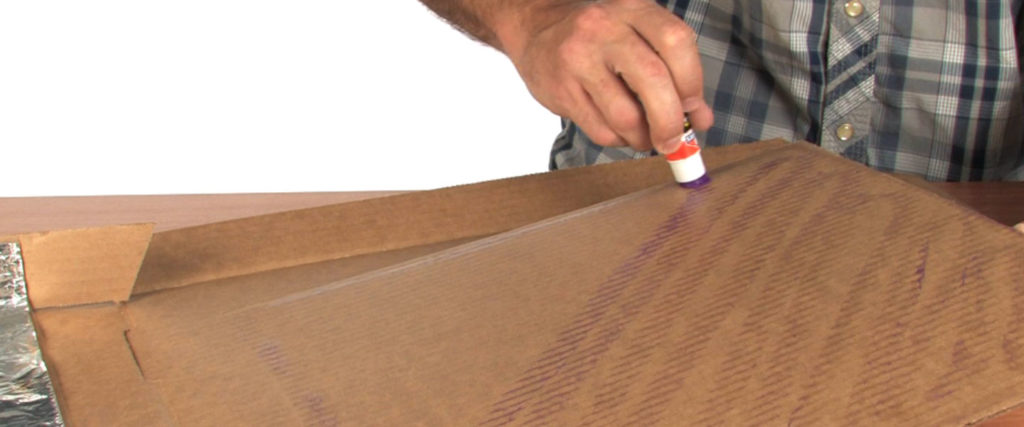
Apply glue to the bottom and two sides of the box and lay the foil piece on it. Smooth and press the foil onto the glue.
Measure and cut a piece of aluminum foil large enough to cover the inside surface of the flap you cut into the lid in Step 1. Cover this inside surface with glue then smooth and press the foil onto it shiny side out.

Measure and cut a piece of black construction paper that’s 1-2′′ (2-5 cm) smaller along each edge than the bottom of the pizza box. You may need to use more than one piece of paper if the box was for a large pizza.
Center the black paper on the foil bottom of the box. Hold it in place using the clear, wide packing tape around the edges of the paper. Tape it directly to the foil.
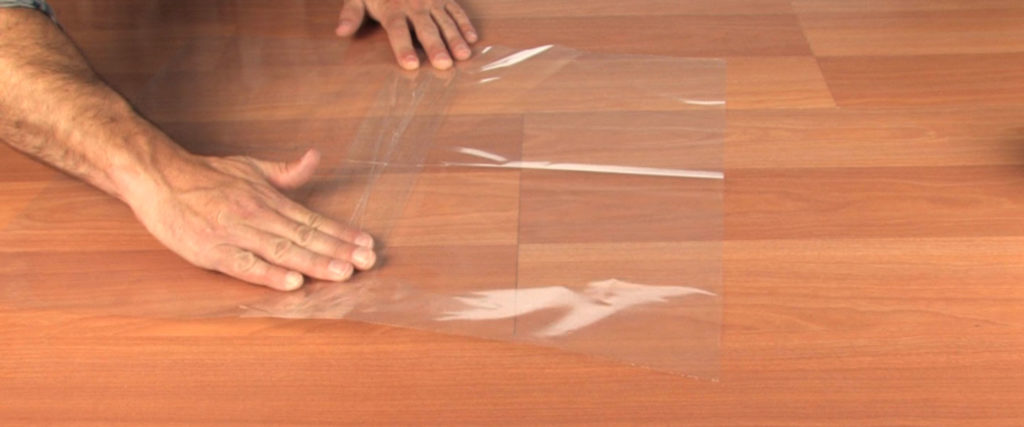
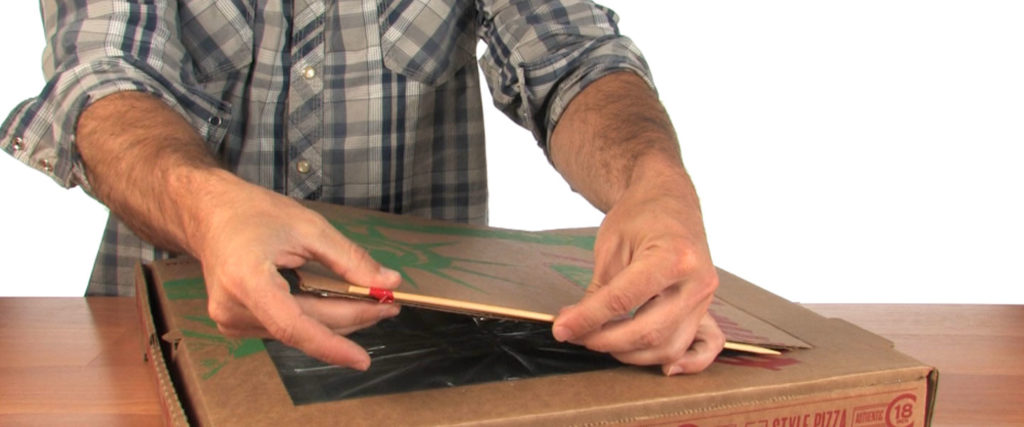
Grab both page protectors and carefully pull the thin sheets apart along the short, bottom edge of each sheet. Lay out both rectangles and tape two long edges together to make a single large piece of plastic.
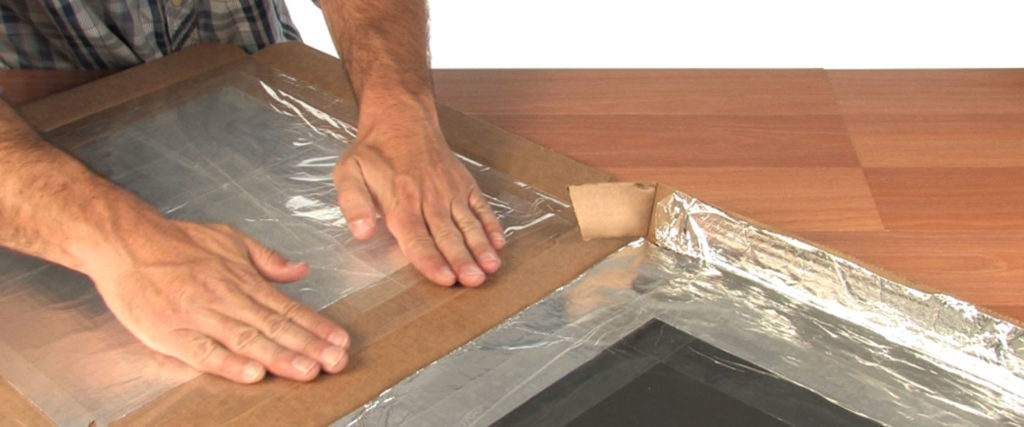
Tape your plastic creation to the inside of the box lid so it’s smooth and tight. DON’T tape it to the flap you cut out; tape it inside the lid. The flap should still move freely and the plastic should cover the flap’s opening from underneath the lid.
Use the sharp end of the skewer to poke two small dents about 2” (5 cm) apart into one side of the lid. Make them about .5” (1 cm) from the flap and about halfway along the flap. Don’t poke all the way through. You’ll use these dents as a way to prop the flap open during cooking. See Step 12.

Wrap a 5” (13 cm) piece of sticky tape around the skewer near its flat end. Do it in such a way that the tape crosses itself on the stick. The skewer and tape make the letter “T”. This will be the “kickstand” you use to prop open the flap.
Use the sticky tape on the skewer to attach the skewer to the side of flap that has the dents in the lid you made in Step 9. The pointy end of the skewer goes toward the hinge of the flap. The top half of the tape goes over the flap and the bottom half goes under the flap.
You’re almost ready to cook! Open the lid and load your oven with a few s’mores. For this recipe, use one graham cracker as a “pan” to hold the chocolate and the marshmallow. Put on the top cracker when you’re ready to eat it up. Keep the s’mores kind of spread out on the black paper in your oven.
Before you close it up for cooking, you might want to tape a thermometer near the black paper inside the box. Put it in a spot that you can see through the plastic liner so you can keep track of the temperature inside your solar oven.
When you’re ready, go out into the midday sunshine, set up in a spot that will have full sun for a long time, and open the flap. Adjust the flap to reflect as much heat as possible into the oven. You’ll have to leave it for a while but check on it every so often so you can keep it pointed toward the oven in the sky. Your treats will be ready soon!
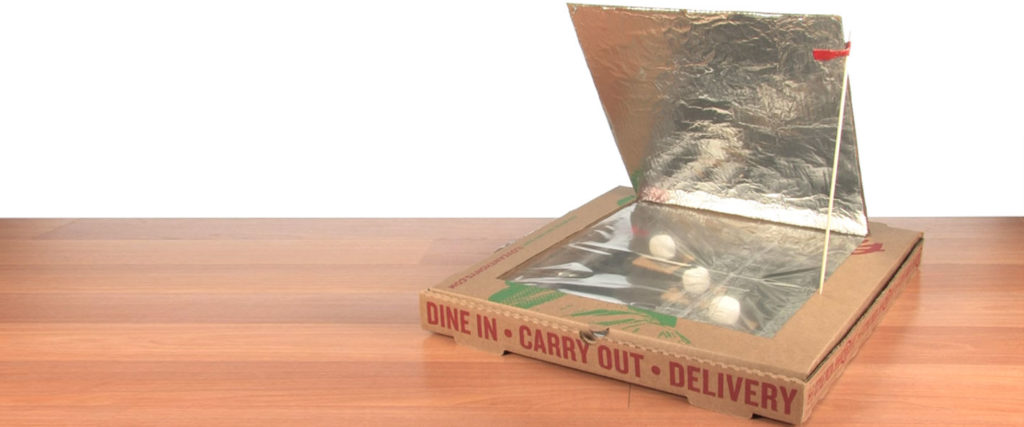
The “Solar Oven” you made is more correctly known as a solar cooker. A true oven can reach temperatures far above the heat trapped inside a pizza box. Duh! Your cooker works on the principle of collecting heat energy and retaining or directing it for cooking. To make the process work, you cover as much of the interior of the box as possible (including the flap) with reflective material in order to direct as much heat as possible into the center of the cooker. In this case, you use the shiny side of aluminum foil. It’s important to adjust the flap and the position of the box to grab all the heat you can as the sun moves across the sky. The actual “cooking” surface is black construction paper because black retains heat very well. As heat is retained, the air inside the oven also heats up and the plastic helps hold it in the small space. You load in your treats and the next thing you know, you’re eating delicious, melted-by-the-Sun s’mores!
The Roman emperor, Nero, is credited as the first person to have a type of ice cream made for his meals. Snow was used to […]

If you’ve watched videos on a smartphone, then you know it can be tough to really enjoy the show on such a small screen. For […]
The animals of the Arctic and Antarctic circles spend their lives surviving subfreezing air temperatures and frigid water. Their secret is blubber, a thick layer […]

Science is often referred to as the most fun subject in school mainly because… it is! It can be a most delicious subject, too. When […]

Marshmallows are a tasty, fluffy staple of summertime s’mores, campouts, and backyard barbecues. There really isn’t very much to them, either. The scientific way to see […]
A vacuum packer is an amazing device that vacuum packs food to seal in the freshness. At least that’s what those late night infomercials tell […]