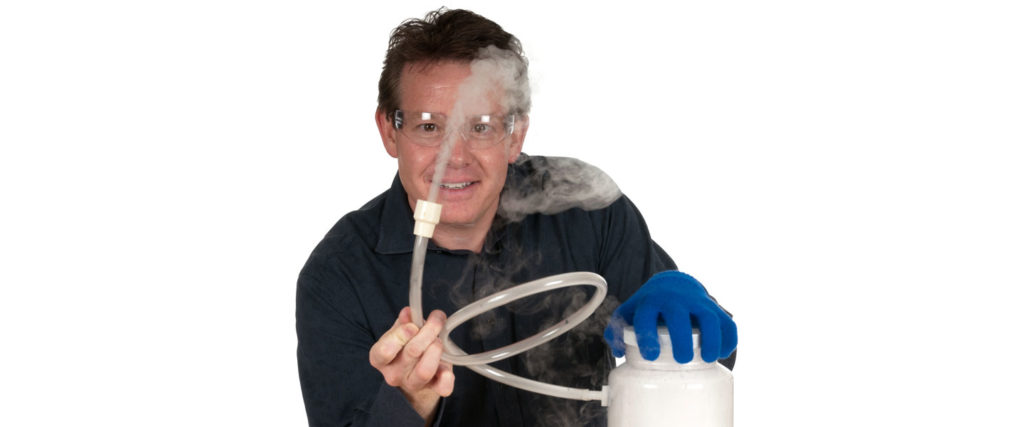
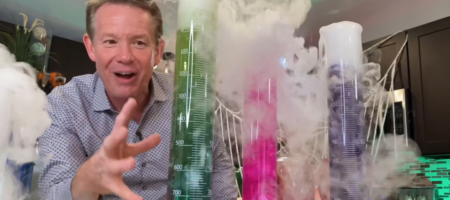
Dry Ice Smoke Ring Launcher
Inspired by Steve Spangler’s original trash can smoke ring launcher, this mini version uses easy to find materials to make your vortex vapor ring launcher. […]

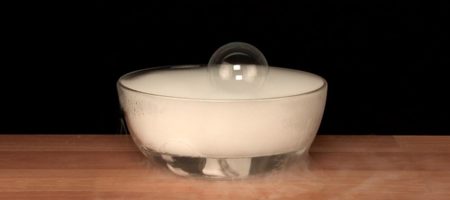
Bubbles are cool, but bubbles filled with fog are even more cool. Just imagine the cool factor going up tenfold if you could bounce and play with these bubbles. Boo Bubbles are what you get when you fill a bubble with a ghostly carbon dioxide cloud. But Boo Bubbles are truly magical because you can roll them on your hands, bounce them off your sleeve, and pop them to release the burst of fog.
Making the Dry Ice Bubble Generator
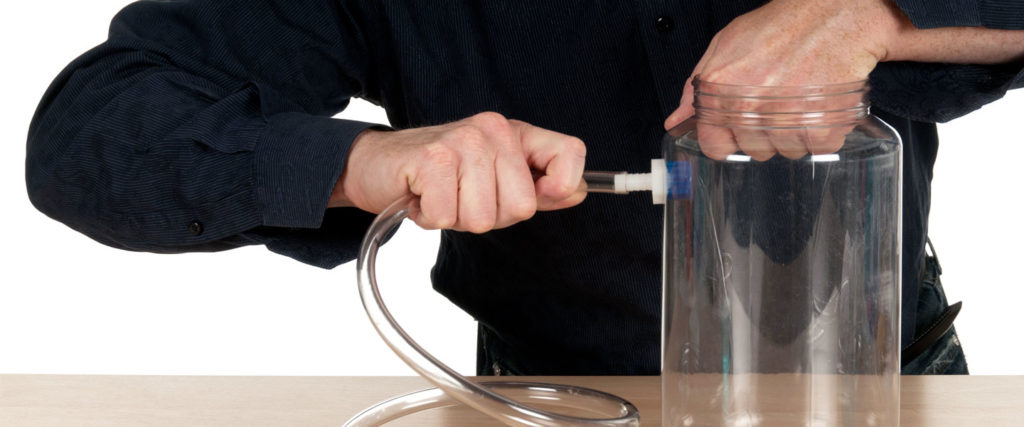
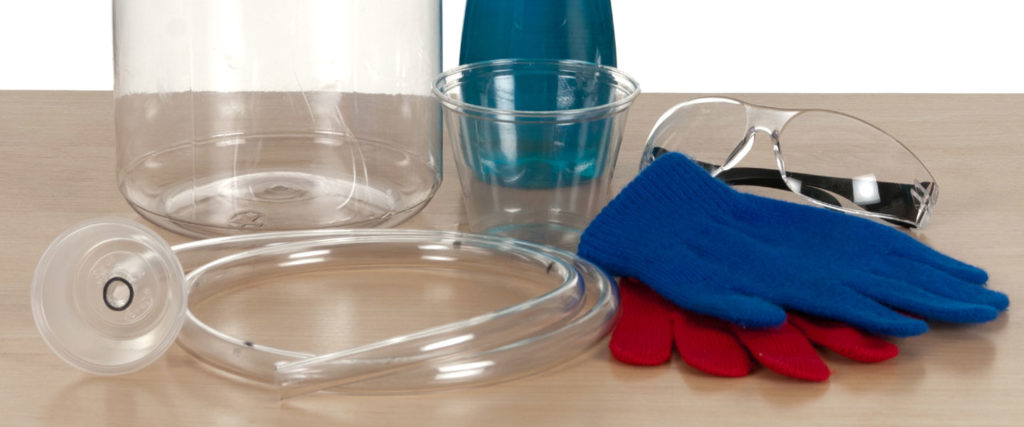
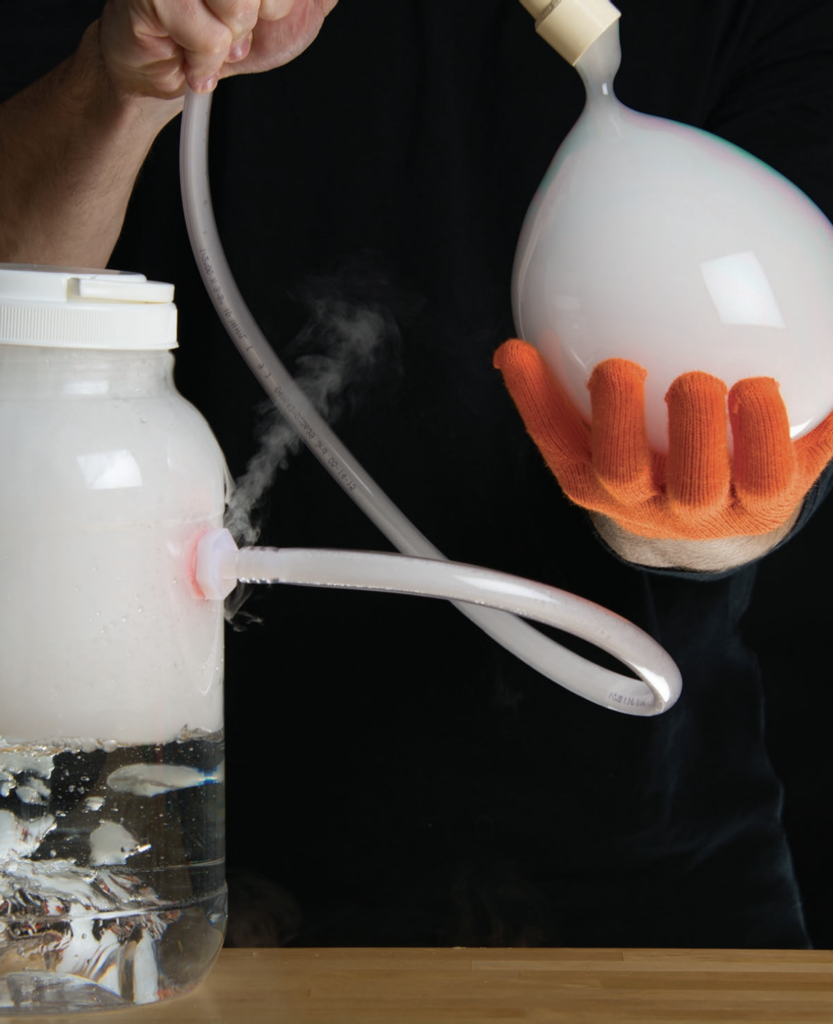
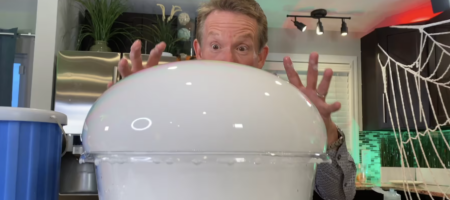
You’ll need a gallon-sized plastic jar with a 3-foot long piece of rubber tubing attached to the side. The goal is to attach the tubing to the top part of the jar so that the fog created by mixing dry ice and water blows out of the tube when you cover the top of the jar with the lid. The free end of the rubber tubing is attached to a small funnel or something similar to help blow bubbles when it’s dipped into a soapy water solution. The best approach is to start with the plastic jar and spend some time walking through the plumbing aisle of your local hardware store to consider all of the ways to attach a piece of plastic tubing to the jar. It could be as simple as drilling a hole in the jar and attaching the hose with a piece of tape or a dab of caulking or glue. The design is up to you.
Performing the Experiment
Start by putting on your attractive safety glasses and thick leather gloves. You might need to use a hammer to break up the dry ice into pieces that will easily fit into the jar.
NOTE: You’ll need some thick gloves to handle the dry ice. The knit gloves used later in the activity do not provide enough protection for your hands. Find a good pair of leather gloves to protect your hands against the cold temperature of the dry ice and you’re set.
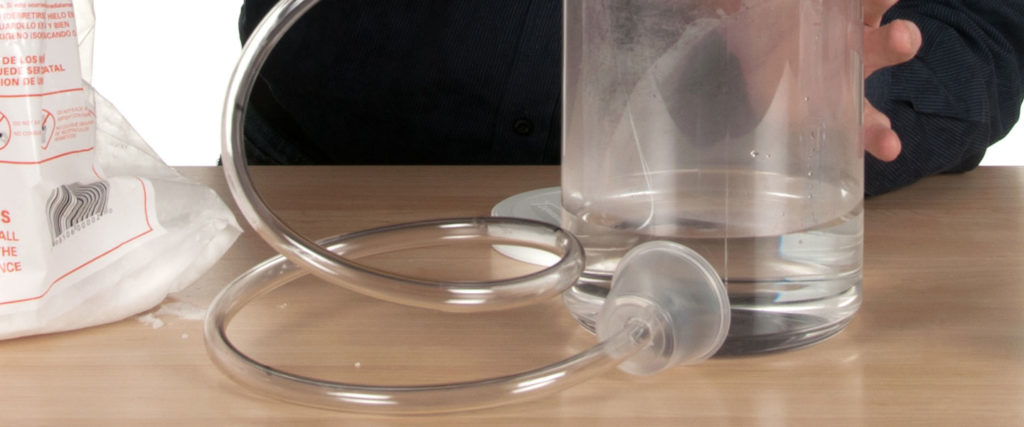
Fill the jar one-half full with warm water. Dry ice produces the best fog when you use warm water. Attach the rubber hose to the side of the jar (if it’s not already attached).
Drop a few good-sized pieces of dry ice into the jar. Immediately, the fog will roll out of the jar. Practice covering the top of the jar with the lid to control the flow of fog out of the tube. You don’t have to screw the lid onto the jar. Just hold it on top of the jar to force more or less fog through the rubber tubing.
WARNING!
Never trap dry ice in a jar without a vent. In other words, there MUST be a hole in the jar to allow the pressure to escape. Otherwise, the pressure will build up and the jar will explode! This could cause serious harm to you or to someone else.
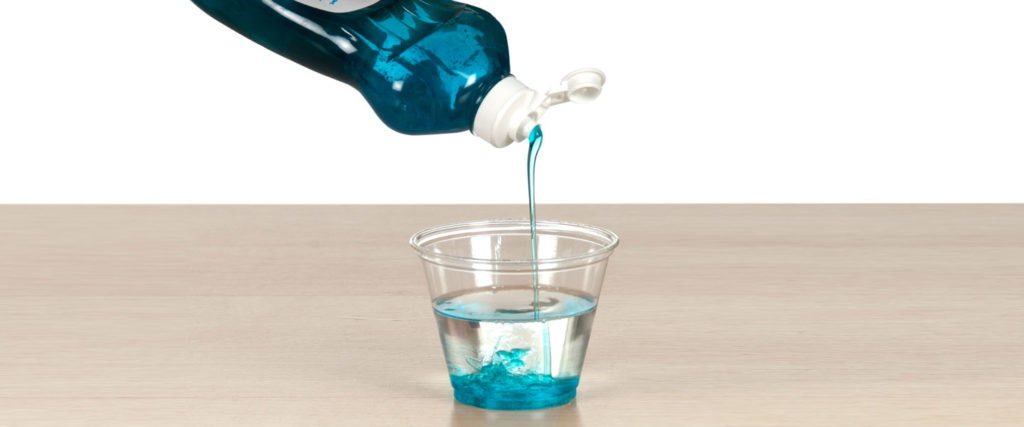
Make a soapy solution by mixing a squirt (that’s a very technical term!) of liquid soap with about 4 ounces of water in the small plastic container.

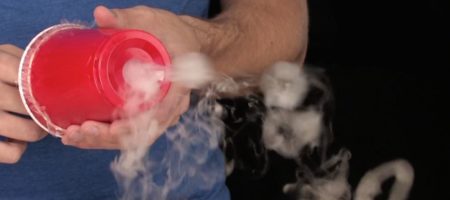
Dip the free end of the rubber tubing (either the “naked” tubing or the end of the tube “dressed up” with a small plastic cup, funnel, or fitting from the hardware store) into the bubble solution to wet the end of the tube. Remove the tube from the bubble solution with one hand while covering the jar with the lid in the other hand. This will take a little practice, but it’s easy once you get the hang of it. The goal is to blow a bubble filled with fog.
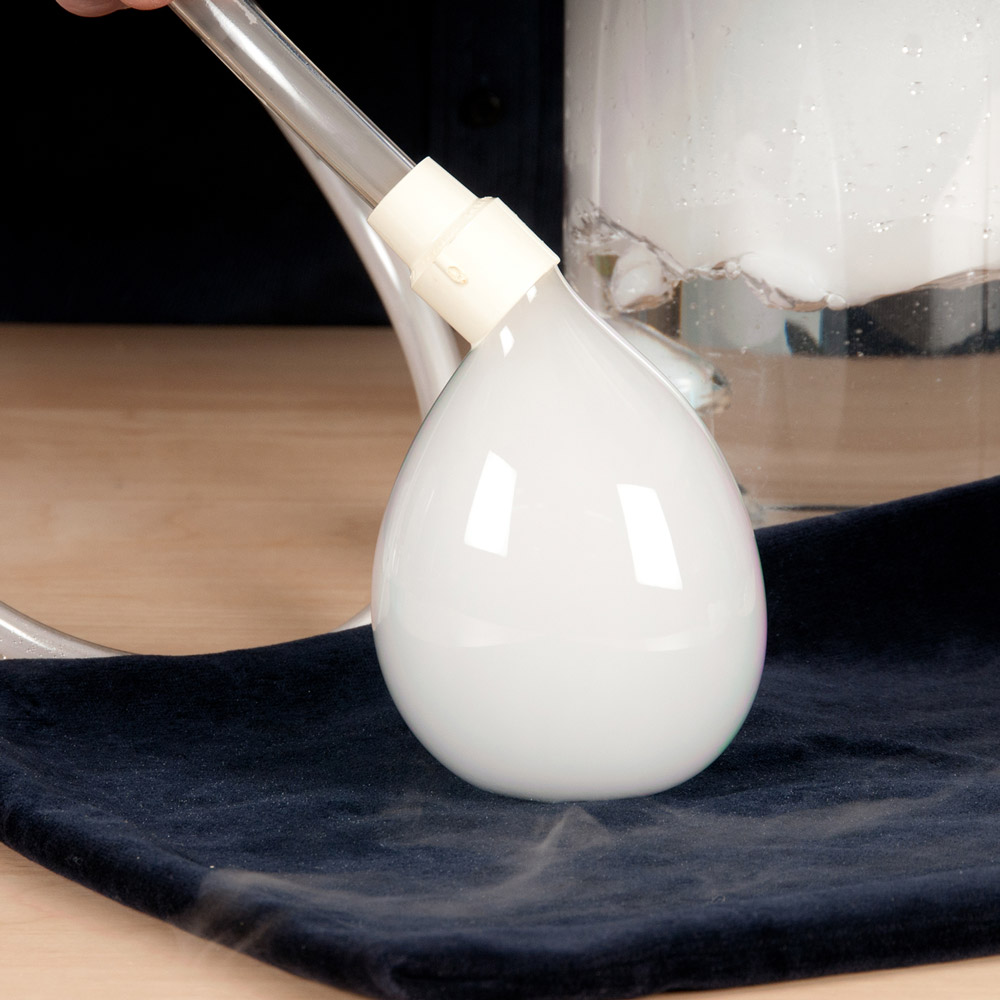
When the bubble reaches the perfect size, gently shake it off of the tubing and it will quickly fall to the ground (it’s heavier than a normal bubble because it’s filled with carbon dioxide gas and water vapor). When the bubble hits the ground, it bursts, and the cloud of fog erupts from the bubble. Very cool!
While blowing bubbles indoors, you might have noticed the occasional bubble that fell to the carpet but didn’t pop. Regular bubbles burst when they come in contact with just about anything. Why? A bubble’s worst enemies are oil and dirt. Soap bubbles will bounce off of a surface if it is free of oil or dirt particles that would normally puncture the soap film. They break when they hit the ground, but they don’t break if they land on a softer fabric like gloves or a towel.
Dry ice is frozen carbon dioxide (CO2) Under normal atmospheric conditions, CO2 is a gas. Only about 0.035% of our atmosphere is made up of carbon dioxide. Most of the air we breathe is nitrogen (79%) and oxygen (20%). Instead of melting, dry ice turns directly into CO2 gas. It does not “melt” like water ice because it skips the liquid stage and goes straight from solid to gas. When you drop a piece of dry ice in a bucket of water, the gas that you see is a combination of carbon dioxide and water vapor. So, the gas is actually a cloud of tiny water droplets.
Grocery stores use dry ice to keep food cold during shipping. Some grocery stores and ice cream shops will sell dry ice to the public (especially around Halloween) for approximately $2 USD per pound. Dry ice comes in flat square slabs a few inches (cm) thick or as cylinders that are about 3″ (76 mm) long and about .5″ (13 mm) in diameter. Either size will work fine for your dry ice experiments. Remember the science . . . dry ice turns directly from a solid into a gas—a process called sublimation. In other words, the dry ice in the grocery bag will literally vanish in about a day!
Bouncing Boo Bubbles
This Boo Bubble variation happened accidentally and now it’s a must-do whenever you play with Boo Bubbles. A bath towel was stretched out on the table in an effort to make the soapy cleanup just a little easier. To everyone’s amazement, some of the fog-filled bubbles bounced on the towel and didn’t pop! It just goes to show you that what some people call “play time” is actually high-level research (okay, maybe it’s not real research, but it is play with a purpose). It’s important to mention that not all types of fabric behave the same way. Ponder that for a few minutes before reading about the science of the bouncing bubble in the following pages.
Touchable Boo Bubbles
If fog-filled bubbles will bounce off of a towel, what would happen if you wrapped your hands in fabric and tried to touch or play with the bubbles? You can easily find out by purchasing a pair of inexpensive children’s winter gloves. Blow a bubble about the size of a baseball with the Dry Ice Bubble Generator. Bounce the bubble off of your gloves. Try bouncing the bubble off of your shirt or pants. Again, some fabrics work better than others. Try bouncing bubbles on a hand towel or start up a game of volleyball bubbles with another friend who has too much time on her hands.
Giant Boo Bubbles
Regular-sized Boo Bubbles are awesome, but Giant Boo Bubbles are even more awesome! All you need are a few parts and pieces from around the house and you’ll be making these giant, fog-filled bubbles in no time. Cover a clean table surface with a thin layer of soap bubble solution and spread it around. Fill the large water bottle with warm water and drop in a few big pieces of dry ice. Again, NEVER put any type of lid on the bottle or do anything that would seal the bottle closed. The rapidly expanding gas could result in an explosion.
Hold the large plastic hose (similar to the kind you’d find on a shop vacuum) over the top of the large water bottle. The carbon dioxide cloud will start flowing out of the hose. Make sure you don’t plug the hose so the gas can’t escape. That never ends well . . . trust us.
Dip the open end of the hose into the bubble solution and put it down on the soap-covered table. A giant Boo Bubble will start forming on the surface of the table! Keep the nozzle down and your bubble will just get bigger and bigger and bigger. When the bubble finally pops, all of that carbon dioxide gas will escape, leaving a ghostly fog behind.
NOTE: Whenever you use dry ice, always be aware of the rules for handling it safely.
• This is not a toy. It’s for demonstration purposes only.
• Use dry ice only with adult supervision.
• Dry ice must be handled using heavy gloves or tongs. It will cause severe burns if it comes in contact with bare or unprotected skin.
• Always wear safety goggles when handling dry ice. The debris and shards are extremely dangerous to your eyes. When tapping dry ice with a hammer to break it, first cover the dry ice with a towel to keep the pieces in one place.
• Never put dry ice in your mouth.
• Never store dry ice in an airtight container. As the dry ice sublimates, gas pressure will build and the container will explode. Make sure your container is ventilated or has a loose-fitting lid.
• Do not store dry ice in your freezer. It will cause your freezer to become too cold and the freezer may shut off. On the other hand, if you lose power for an extended period, dry ice is a good way to keep things cold, if you can get it.
• In the unlikely event of a dry ice burn, treat it the same as you would a heat burn. See a doctor if the skin blisters or comes off. Apply antibiotic ointment to prevent infection and bandage mild burns.
Remember that dry ice is not frozen water – it’s frozen carbon dioxide (CO2). Unlike most solids, dry ice does not melt into a liquid as the temperature rises, but instead, changes directly into a gas. This process is called sublimation. The temperature of dry ice is -109.3°F (-78.5°C). Dry ice is particularly useful for keeping things cold because of its temperature. Dry ice does not last very long, however, so it’s important to purchase the dry ice you need for these science activities as close as possible to the time you need it. The best place to store dry ice is in a Styrofoam ice chest with a loose fitting lid that allows the CO2 to escape as the ice sublimates.
Remember the science when purchasing dry ice. Dry ice in a grocery bag will vanish in about a day. The experts tell us that, depending on weather conditions, dry ice will sublimate at a rate of 5 to 10 pounds (2.3 to 4.5 kg) every 24 hours even in a typical Styrofoam chest. So, again, it’s best to purchase the dry ice as close to the time you need it as possible. Last minute shopping is necessary. If you are planning to perform a number of dry ice demonstrations or have a lot of people involved, purchase 5 to 10 pounds (2.3 to 4.5 kg). A little dry ice does go a long way in these activities.
The first step in making dry ice is to compress carbon dioxide gas (CO2) until it liquefies while at the same time removing excess heat. The CO2 will liquefy at a pressure of approximately 870 pounds per square inch (4500 cmHg) at room temperature. Once liquid CO2 is formed, the CO2 is sent through an expansion valve and enters a pressure chamber. This pressure change causes the liquid to flash into a solid and causes the temperature to drop quickly. About 46% of the gas will freeze into “dry ice snow.” The rest of the CO2, about 54%, is released into the atmosphere or recovered to be used again. The dry ice snow is collected in a chamber where it is compressed into block, pellet, or rice-sized pieces using hydraulics. It’s complicated but really cool science – really cool.
Can you make your own dry ice? Sure, anything is possible, but it’s not practical (unless you have a huge tank of compressed CO2 sitting around and lots of extra time and equipment on your hands). For around $2 USD a pound, it’s hard to beat the convenience of just purchasing it at the store.
Inspired by Steve Spangler’s original trash can smoke ring launcher, this mini version uses easy to find materials to make your vortex vapor ring launcher. […]
Create a soap film on the rim of a bucket and, with one other simple ingredient, you will have made the world’s coolest crystal ball. […]
Exploration into the fascinating world of dry ice is never boring, and the same goes when you add in some bubbles! Bubbles will float on […]
If a science activity bubbles furiously, belches clouds of water vapor while changing colors, and does it safely all at the same time, then you’ve […]

Blowing up balloons can be quite the task. You’ll spend a ton of time huffing and puffing while blowing your breath into the rubbery orb. […]